|
Normally when I think about preparing for a new semester, it includes going to the office supply store or back to school section of the big box shop and stocking up on the various things one might need for a normal semester.. and I have written posts like that before. But, here we are in the middle of a pandemic with many schools starting the semester online or having committed to a full semester of online instruction. So, this time I want to focus on the various tools that I've found for making online courses work for me.  Recognize the patternsHaving worked in IT project management in my past life, I found that most things can be duplicated for efficiency. Rarely is there a situation that does not have a consistent pattern. Every class and every professor tend to have a structure to the material, teaching style, and even quiz/exam formats. Personally I like to think of myself like Sherlock Holmes trying to get a feel for those patterns in the first couple of weeks. Generally, they are the best indicators of how I will not only organize my physical space but my thinking for that class. For instance, I once had a music appreciation course online and noticed that the quizzes and review questions had certain things in common. I was able to create an Excel spreadsheet filling in the various columns and found myself very successful in that class. Then, a sociology professor was good about providing key information in an unexpected but same place each week that helped me organize my thinking and in turn figuring out what would be on the quizzes and exams became a weekly game. Finding the patterns for that class and professor is a game changer. One Note by Office 365This is just my opinion, and one I am not paid for.. This is honestly a fantastic tool that I use and feel that not enough students know about. Plus, it is free to students if you visit the link at the bottom of this article. The thing I love about this program is that it is very much like the typical spiral bound notebooks that I ordinarily will use to take notes in, but I can re-arrange things, add additional information, or even paste a screenshot capture right into the notebook page. Best of all, as I'm preparing for exams or looking through to see if my notes are complete, there is a search function that makes it easier than a physical notebook to double check or find information. My school uses canvas as the online platform, so generally I will wait until the professor puts out the first module to determine whether or not I'm going to organize the virtual notebook by chapter, week, or topic. Staying flexible and finding an organization pattern that goes with the course contents has always been helpful for me. 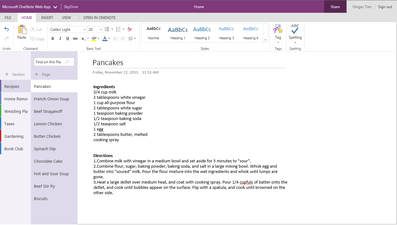 OneNote in action (from Microsoft site) If your professor posts PDF or Word documents, they can be added to OneNote by "printing to OneNote" and inserting the document where you want to send it. Then, just take notes right there on the slides. Super helpful! Another fantastic tool that OneNote has is the dictation feature. So, oftentimes as I'm reading instead of typing I will dictate my notes then go back and just make sure that autocorrect has not run amok. Personally, I like to take my notes on the chapter or reading before lecture and then fill in while on a video class with the professor with anything that I may have missed. No matter what, I always try to make sure that key vocabulary, learning objectives, and concepts are well covered in my notes just as if it was a handwritten notebook. If I have gone on to YouTube, Pinterest, Khan academy, or other websites I make sure to bookmark and link those resources right into my notebook for future reference as well. A physical calendarIn previous posts I have talked about the importance of finding a planner and an organization method that works best for you. Personally, because I have so much on my plate and things are fluid with my husband also working from home, (6 feet away), a teenager starting his freshman year of high school this fall and being the designated errand runner for our pod, my preference is to organize by task list rather than day. Basically, I use my weekly spread to notate specific appointments or time frames that are non-negotiables. Then, I make sure that my planner always has a horizontal layout with days of the week on one side of the spread and list making space on the right page. If you are looking for something like that, click here for an instant download option
An exercise trackerOkay, so maybe nobody else thinks that this relates to getting ready for this semester, but I insist that it is a necessity! I don't know about anyone else but this pandemic has given me more than a few excuses for not leaving the house and getting my body moving. So, I created a tracker for me to fill in so that I can challenge myself to get at least 20 minutes of walking in per day. Again, link below. Maintaining physical health by eating right and getting at least a few minutes of exercise per day can go a long way towards making certain that our brains are functioning at a high level and we are able to best absorb information while keeping our mental health in check. If hot yoga, Pilates, running, jump roping, underwater basket weaving, or some other activity is more up your alley then by all means make that your daily goal! Regardless of the activity it's just important that we move. Quizlet, Crowdsource, and Study BudsHere's the thing - when we're on campus we end up meeting people before or after class who are like-minded, look like us, or have similar interests. We tend to form groups and make connections easily under these circumstances. However, without being able to really see and interact with our classmates as easily with an online course or forum, we need to find new ways to bounce thoughts and ideas off of others. I have found that searching Quizlet, chegg, or other platforms allow me to see how other students think, absorb the information, or What might be relevant for an upcoming exam. If your professor provides discussion boards, a Piazza site, or other forms of communication for the class, I implore you to be open to participating in those as well. During the spring 2020 semester I paid attention to who was asking intelligent questions during the zoom lectures and reached out to those people individually on chat. They became part of my core study group and we would often spend hours discussing the course content. We were a great group in that we all brought a unique take, way of thinking, and set of strengths to the table. By working together and collaborating while doing homework and studying, we all were able to make it out of a very difficult course with an A. Tutoring OpportunitiesThis one really hits home for me because I am a peer tutor. What most people don't understand is that had I not gone to tutoring and found the value, I may have never stumbled upon this opportunity. Many schools offer tutoring services free of charge to their students. You just have to know where to look! I highly recommend that if you are school website has a search bar you type in "tutoring" and see what pops up. Chances are you can get at least a couple of sessions free per week as opposed to paying for somebody to help you in your studies. Now, I have to warn you that they may only be available during "normal business hours" so, I encourage you to be flexible and willing to see what you can do to make it work. Additionally, many professors will give extra credit for going to their recommended tutor or beacon sessions. Good LightingMy last suggestion goes back to physical health. It is important that when we are studying we have proper lighting so that we can stay engaged in the material, not strain our eyes, and help to offset some of the blue light that we will undeniably be subject to due to the increased number of hours in front of a screen. Most of the time I wear glasses, so I make sure that my lenses have a blue blocker in them. (Shout out to zenni for being awesome, cheap and stylish) If I didn't wear glasses before, I would probably wear these just to protect my eyes from the incessant blue screen viewing I do. However, I'm also keen on being sure that I have natural light as well as other light sources besides just my computer monitor with which to study by. Since we have no idea how long this pandemic will last or what changes will come technologically because of it, it is important that we take care of our eyes in the short-term so that we don't wear them out unnecessarily long-term. Hope these tips were helpful Xoxo, Michelle Other Blog Posts to Consider168 Hours - How Do You Use Yours? How to Read Your Textbook and Understand It How I Study for College Exams The Best Test Prep Advice All the linksOneNote for Students: https://www.microsoft.com/en-us/education/products/office How to Use OneNote Videos: https://bit.ly/3kLfCG7 Weekly Planner Option 1: https://bit.ly/3kGzqur Weekly Planner Option 2: https://etsy.me/3aBRIs3 Walk Tracker; https://bit.ly/3kEwkae Quizlet: https://quizlet.com/ Chegg: https://www.chegg.com/study StudyBlue: https://www.studyblue.com/ Blue Light Block Glasses: https://www.zennioptical.com/blokz-blue-light-glasses More Reading and Videos from CCCCalifornia Community Colleges: https://cvc.edu/keeplearning/
1 Comment
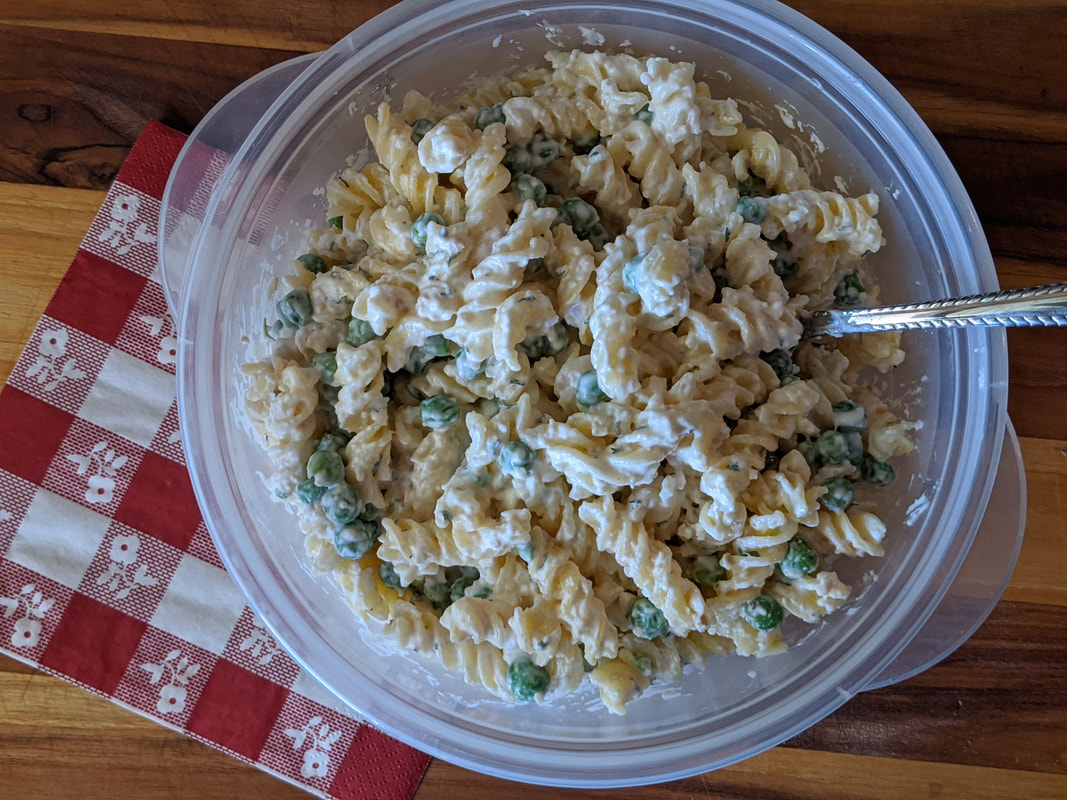
In the early 2000's one of my massage therapy clients went to the local co-op and came in just after eating this salad and raved about it for about 20 minutes (while simultaneously smelling of garlic). A couple months later when they were in for another appointment, they brought some for me to try; IT. WAS. AMAZING!!! For a long time after I wondered how it was made, and struggled to duplicate it. Then, a friend worked at the same co-op and got me the recipe which has since been lost, but I knew the basic gist and was able to make it my own. This is a favorite for family gatherings, potlucks, or when my husband and I are craving something packed with flavor. 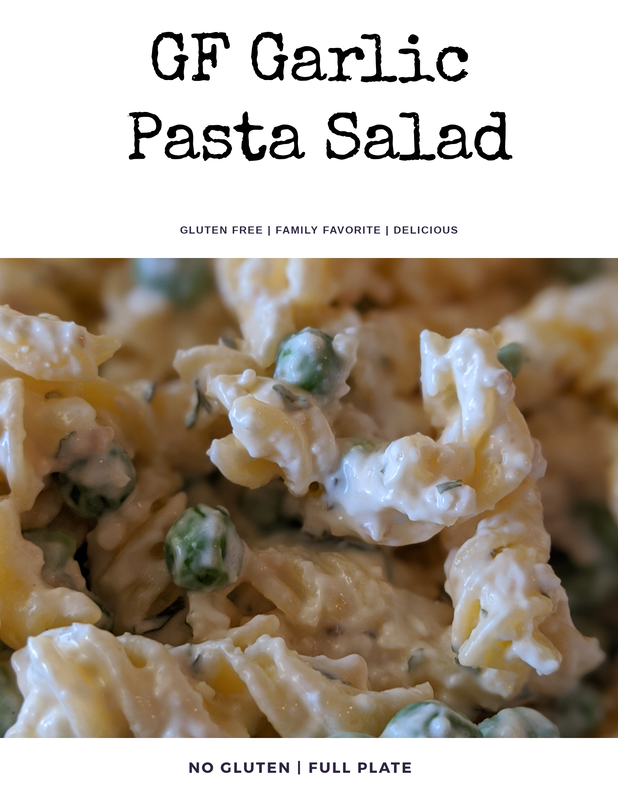 Ingredients
Directions
 I hope you enjoy!
XO, Michelle  Why didn't anyone tell me earlier how easy it is to brew your own kombucha?! If you can brew tea, use a stirring spoon, and have a spot in your house that is warm and out of direct sunlight, you officially meet all of the criteria for being your very own brew master. There are a bunch of books on the market that have recipes and instructions by people that have been doing this waaay longer than I have. I'm not going to pretend to be an expert on the subject. I'm sooooooooo NOT! But, I have been playing around with my second ferment flavors and stumbled upon a few that I love and cannot get enough of. My jar SetupAfter brewing the tea in a large, slightly more than a gallon jar and letting it ferment, I transfer the liquid to smaller jars to make multiple flavors during the second ferment. Well, I did.. until I realized that there were a couple of flavors that I loved and wanted to have more of all the daggon time! I was lucky to have a gallon size mason-style jar that we used to store my tea bags in when there were more kids home and we all had favorite flavors cuz that many boxes was just nuts in my tiny cabinets, so I use that for the brewing. Or, other times I use another glass jar that maybe at some time in a past life was a pickle jar. Neither of them have lids, and that is okay because when brewing, I just cover the jars with an old cloth napkin affixed with a rubber band so that air gets in and out, but no bugs can ruin the party. My smaller jars are either mason jars outfitted with plastic lids and special gaskets, or recycled kombucha bottles (GT or Kirkland) from when I was buying it. I have not spent a lot of money on this delicious hobby. There was that one time I did buy that jar heater which all but boiled a scoby into oblivion.. I do not advise letting your sweet babies get over 95 degrees unless you want to scrounge up another scoby someplace. I try to keep mine right about 75-82 degrees which sometimes means I have the jar heater near the jar, but not wrapped around it so that it is more of an ambient heater... Additionally, after a couple of tries with flavorings I wanted to remove some of the fruit chunks and yeasty strands from the liquid, so I bought some "nut bags" from Amazon that are used primarily by people that are making their own almond, cashew, or oat milks at home. They have been a GREAT investment! 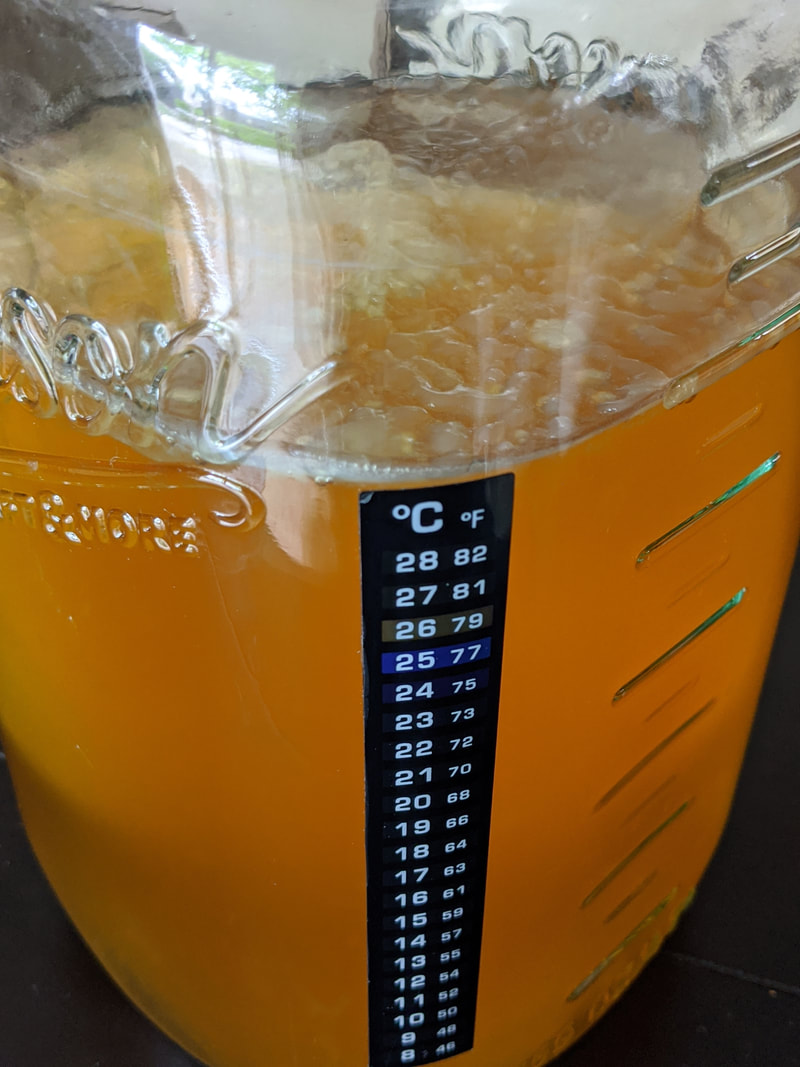 During the second ferment, I add my ingredients, then make sure that the jars are full with no more than a half inch of head space so that the carbon dioxide can build up and carbonate the beverage. They sit for at least 2 days, sometimes 3 depending on the depth of flavor I am looking for. Ultimately, I let my nose tell me when it is done, or use an old medicine dropper to pull out a couple of drops to taste. After the second ferment, but before refrigerating, I run my kombucha through a nut bag, funnel it into jars and then let the jars sit at room temperature another 24 hours to rebuild the carbonation. Mango Ginger Lime1 gallon liquid from first ferment 1 1/2 tablespoons grated ginger 2 ripe mangoes with skin removed and then diced 1/2 cup lime juice + the zest of 1 lime Lemon Ginger Cayenne1 gallon liquid from first ferment 1 cup fresh squeezed lemon juice 1 1/2 tablespoons grated ginger 1/8 teaspoon ground cayenne All the Citrus1 gallon liquid from first ferment 1/3 cup lemon juice 1/3 cup grapefruit juice 1/3 cup any other citrus juice I have on hand Guava Coconut1 gallon liquid from first ferment 1 cup canned guava nectar 1/2 cup coconut water Plum Vanilla1 gallon liquid from first ferment 1/4 cup plum jam (mine is homemade from my huge plum trees) 1/2 teaspoon pure vanilla extract I hope you get a chance to try some of these flavors soon, and share your favorite flavors below in the comments! XO, Michelle Having your own garden is the most amazing thing. Every year I plant zucchini and inevitably there is that one that somehow I didn't see that ends up being about the size of a football before I finally pick it. What are you supposed to do with that, you say? Well, if your family is anything like mine and love pizza, it is the perfect opportunity to use this stuff up. 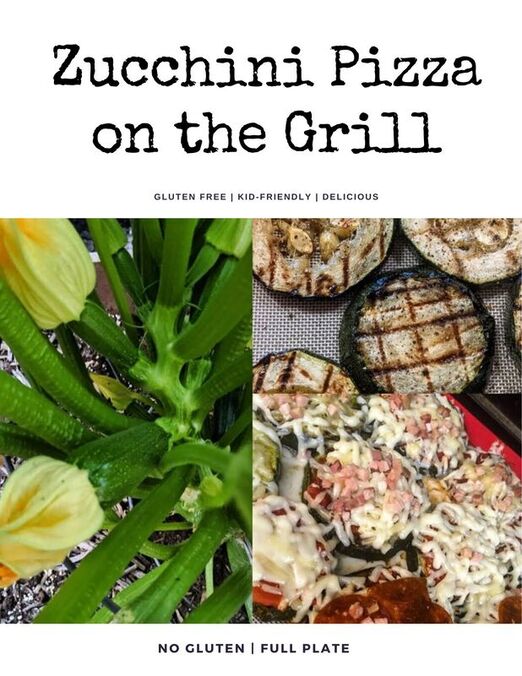 My 14 year old is dedicated to the idea that he absolutely detests zucchini. However, as he was eating this, he remarks that it was incredibly good, as long as he didn't think about it being zucchini. Hahahah So, with that in mind I thought I would give you this recipe to help on those days where you just don't even know where to begin with it. 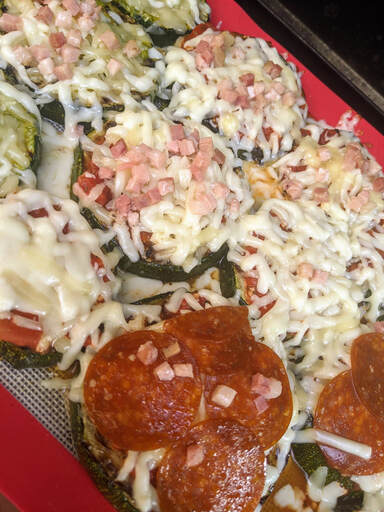 Ingredients
Directions
 During the pandemic I took a post-semester road-trip to Las Vegas and stayed with my friend Liz for about 3 weeks. One day wanting to get out of the house once things had officially reopened, we donned our masks and walked through IKEA. It was there that we were inspired to recreate a piece of artwork we had seen in one of the little showrooms. It literally looks like a stick that they had tied ribbon onto. So, as we were passing through the plants department just before the warehouse started, we noticed some decorative kinda curly sticks and picked them up. That was the base. Next, we looked at the fabric scraps we had following our exciting mask-making adventures and came up with a color scheme. Not having quite enough texture, I took a trip to Jo-Ann Fabric and scrounged around In the clearance department to find some other items to finish things up. I scored some amazing deals purchased an eighth of a yard of a couple of fabric as well as spools of ribbon and skeins of yarn. (And maybe I got a few more quarters and such to make more masks with)  I knew that I really wanted there to be cohesiveness, but not a mirroring on each side. The idea of it being a little bit longer then on each side was quite appealing as well. So, I worked from the middle and slowly added bits of fabric, lace, ribbon, and yarn until I was satisfied with the way it looked. Then, I cut pieces that needed to be cut before hanging it on the wall. Normally I would not call myself very crafty, but in this case, I think I pulled it off!! 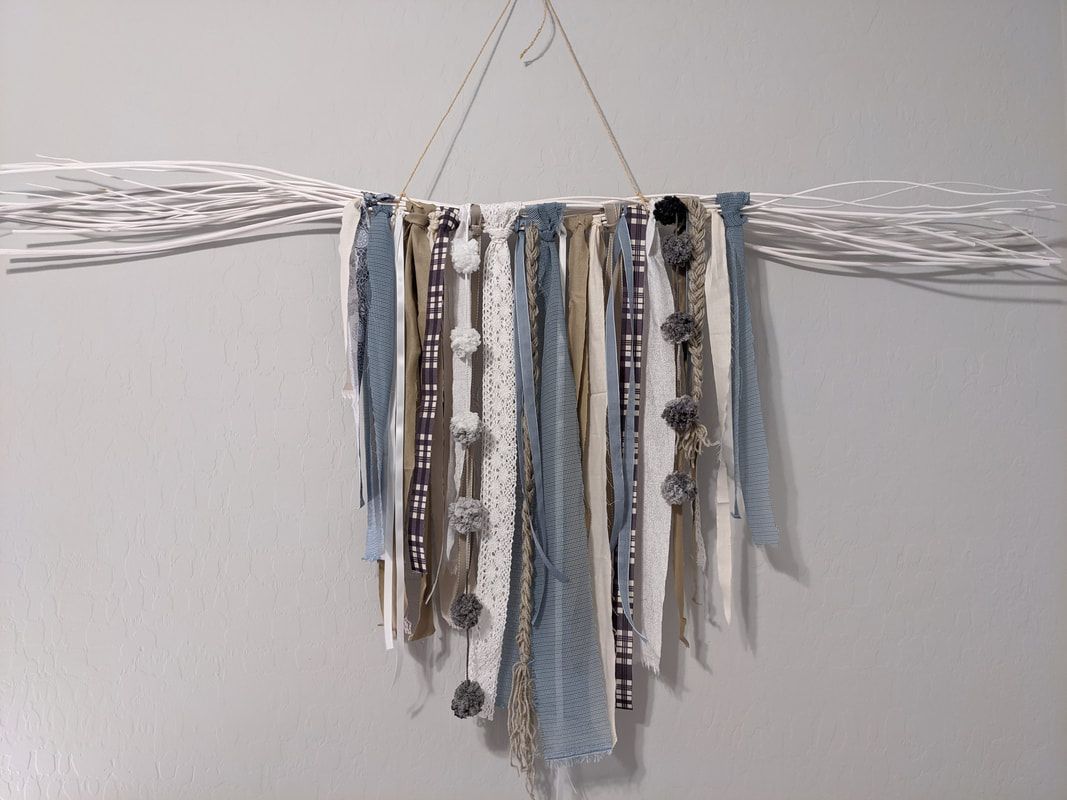  Summer is here and if you are like me that means lots of cooking on the BBQ Grill! A couple of years ago I convinced my sweet husband that if I could have one with a side burner that it would make my jam making and other preserving things go better and we would not have to make a mess in our tiny kitchen - instead I could make the mess outside and then hose things off if it got too out of control. Not to mention that I had replaced the igniter, grates, and other parts on the 15 year old one we had been using and was looking at a lot of rust that wasn't going away. 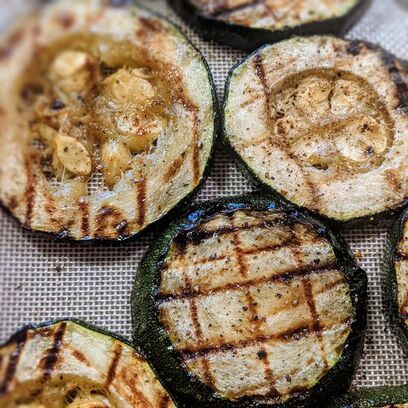 When we first bought it I did some research and came across some golden nuggets of wisdom.. USE WD40 all over the inside and outside to CLEAN and PROTECT the BBQ I had NEVER hear of this before and was skeptical at best, but gave it a try.
Not only did it make the Q nice and shiny, but it also made any little scuffs from being in the box disappear. It was like magic. In order to make sure we did't get nasty fumes and chemicals in our food, I made sure to also turn on the grill and let it get raging hot - there was a lot of smoke at first, but that died down and has been using a towel to wipe the inside super easy. So, at the end of the summer I now use the WD40 to clean off any of the sauces or other sticky messes that weren't cleaned up well and make sure to give the lid and other parts a good liberal spray and wipe before putting on the cover. We use the Q a few times in the winter, but not a lot. Then, in the spring, when I start planting my crops in the garden, I make sure to give the grill another liberal spray and wipe. Give it a try! 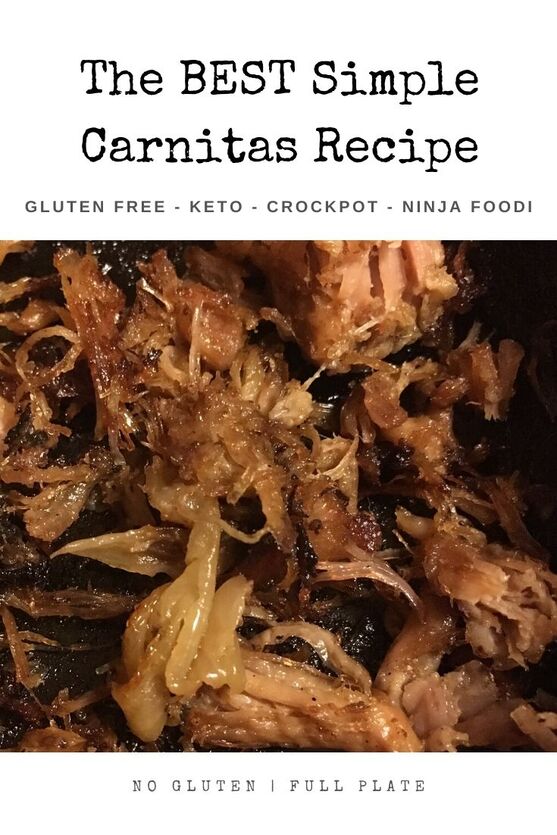 This post is an update from December 2018 I have included TWO recipes below, because I recently got a Ninja Foodi and use it for ALL the things, You can choose your cooking method, but the ingredients are exactly the same! I don't know what your family does for Cinco De Mayo, but in my house we eat something delicious, easy, and likely in the form of a taco. But, you know how much time I have this week with finals approaching? Exactly NONE! So, today, I am making my favorite carnitas recipe. It's simple, and takes only about 10 minutes to prep but smells and tastes like way more time and effort. This recipe is one I found about 10 years ago and even though I lost the recipe and now just wing it, it has become a family favorite. I served it at my Dad's 60th birthday party along with my Kahlua pork on rolls and everyone asked for the recipes. It's perfect for a crowd, or just because. IF you somehow end up with leftovers, make sure to add a bit of the juices to your container. This way, you can add it to a skillet and reheat without the meat losing its juicy yummy flavor. 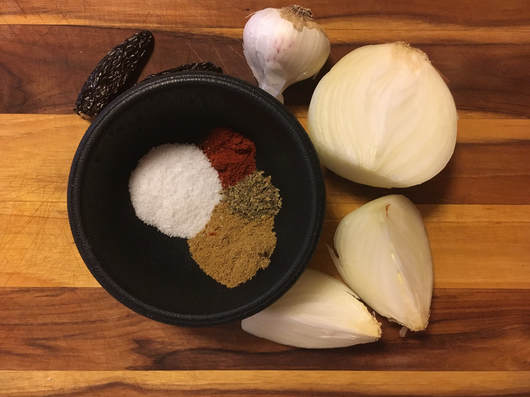 Ingredients1 3-4lb. boneless pork butt or shoulder, cut into about 2-inch chunks 2 t salt 2 dried jalepeno peppers (can sub 1 t chili powder) 1 t dried cumin 1/2 t dried oregano 1 large yellow onion, quartered 2 T minced garlic There is no need to add any liquid as the juices released from the meat and steam created with the lid atop the crockpot are what will cook the proteins and break down the structure of the meat.  Slow Cooker Directions
Ninja Foodi Directions
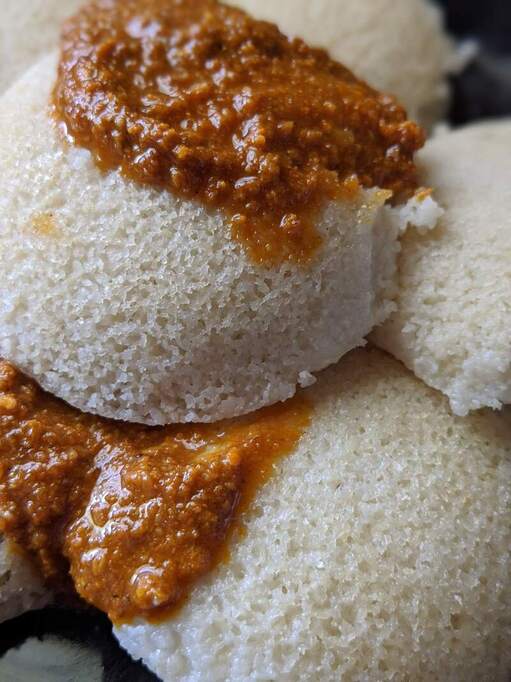
Shred and serve in any application you like (tacos, sandwiches, tamales, burritos, with rice and beans, etc) the possibilities are endless. As you can see we made tacos, but we sometimes make a pineapple cream cheese and slaw then use that on bread to make sandwiches. I've also been known to add bbq sauce to leftovers for pulled pork sandwiches. Talk about making your mouth happy! Xoxo, Michelle  One of the things I miss the most about being gluten-free is sourdough bread! There's something about the dense texture, little air pockets, and fermented taste that just makes my heart sing. I have tried to make gluten free sourdough on multiple occasions, but never seem to be able to replicate the flavors that I used to love so much. A few years ago I worked with a large population of people from South Asia. They introduced me to a variety of new foods, and helped me find brand new favorites! The first time I saw Idli, pronounced eedillee, I was at a lunch buffet at an Indian food restaurant. At first, I was unimpressed with the white round discs, but one bite changed my attitude! It was, for the first time in over 5 years, the closest thing I had tasted to sourdough bread! It took me sometime after that to find anyone who would even attempt to teach me how to make my own at home, but eventually I found someone who was was willing to teach me her ways, take me shopping, and help me get the required materials. Traditionally, these are eaten for breakfast in Southern India, but I can personally eat them any time of the day or night. 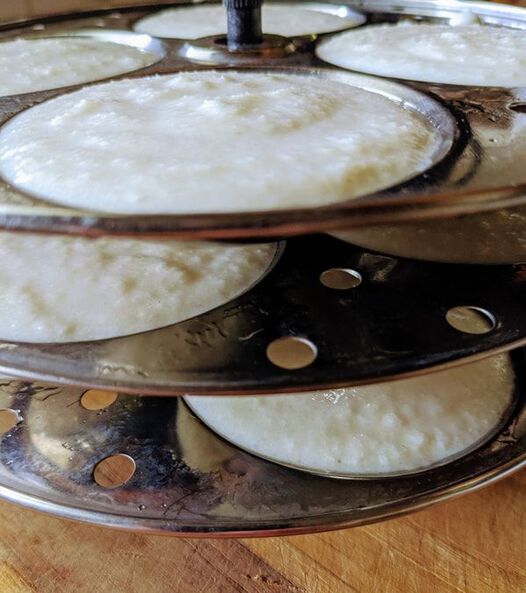 Finding a really good Indian grocery store is imperative! If you do not have one nearby, Amazon does carry a number of the things that you need, but to get the most fresh and delicious end product, you will want to find a store that has good turnover. I happen to live in an area with a lot of people from South India, so there are a number of stores for me to choose from, and I have been able to find brands that I like better than others. As for the Idli stands, at the time, they were only available at an Indian Grocery store. They come in 2 sizes, regular and mini - I prefer the regular size because it means less work - I have a Hawkins brand and another that was a gift from a friend whose mother had an extra set, but the stainless steel Tabakh brand is also really good. 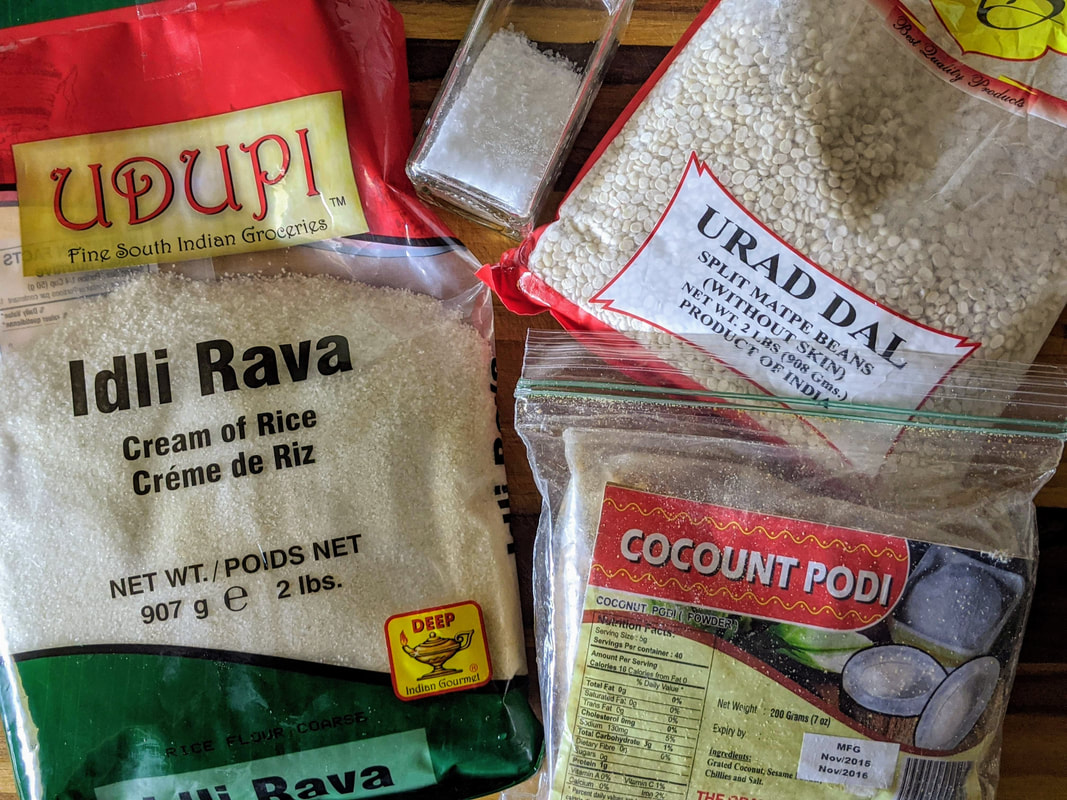 It is important to note that Idli are a fermented food, in the same vein as sourdough, kombucha, or kefir. Therefore it is not something that can be whipped up in an hour. Instead, give yourself 16-24 hours in the summer months, and longer during the winter. The reason for this is that the warmth of the environment has a direct impact on the speed of the fermentation process. 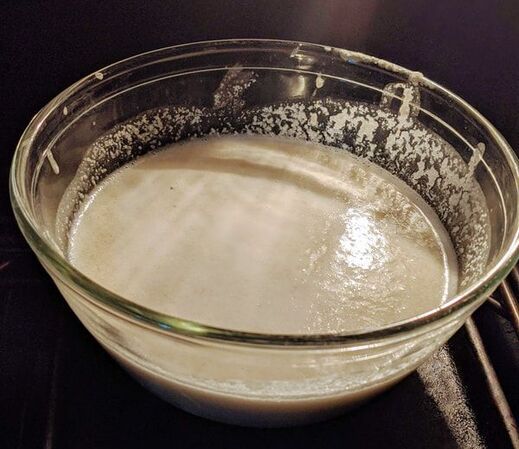 One of the reasons it is so hard to find a recipe for this dish that is straight-forward, is because there is so much waiting time between steps, and specific reasons for how and why things are done. There are no hard and fast rules with regards to timing because often it's about how it looks, smells, and feels. The process is not at all like cooking a box of store-bought mac and cheese. There is a lot of nuance to the dish. For instance, when soaking the rava and dal, they need to be in separate bowls,. Then when they are in the food processor, they again need to be separate. Ingredients
Equipment
preparation
Podi
**Being unable to get the podi ingredients in the past, I have substituted pesto, chimichurri, or other forms of chutneys. Technically a lentil dish called sambar is the accompaniment to idli. 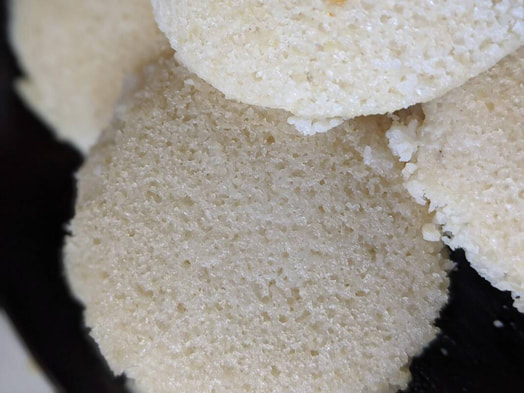
|

Michelle Grubbs: Wife. Stepmom to 3. Student. Tutor and Coach.
AuthorI'm Michelle, and I've got a full plate! As a full-time dietetics student, step-mom, wife, study coach, and tutor in my late 30's, some days I'm barely scraping by. But, no matter what is on my plate, it's always gluten free! Categories
All
Archives
August 2020
|